Skylar Configuration Operation Manual
This manual is for users installing the Skylar desktop app for the first time. After installation, complete setup from the Setup page in the left navigation of Skylar.
1. Install and Open Skylar for the First Time
- Windows users: download and run
Skylar-0.1.0-Setup.exe. - macOS users: download
Skylar-0.1.0.dmg, drag Skylar into Applications, and then open Skylar. - On first launch, open Setup from the left navigation.
- If the page shows setup incomplete, this is expected. It means Google OAuth, Asana, Drive, and LLM configuration still need to be completed.
2. Prepare Google OAuth credentials.json
Skylar uses the Gmail and Google Drive APIs, so you need a Google OAuth client file named credentials.json. Instructions for obtaining credentials.json are in the Google Gmail and Drive API setup section 9.
Google authorization must include these scopes:
https://www.googleapis.com/auth/gmail.readonlyhttps://www.googleapis.com/auth/gmail.modifyhttps://www.googleapis.com/auth/gmail.sendhttps://www.googleapis.com/auth/drive.readonlyhttps://www.googleapis.com/auth/drive.file
On the Setup page:
- Click
Choose credentials.jsonand select your Google OAuthcredentials.jsonfile. - Click
Save credentials.json. - Click
Start Google OAuth. - In the browser page that opens, sign in to your Google account and grant access.
- Return to Skylar and click
Refresh status. - Confirm that both
credentials.jsonandtoken.jsonlabels turn green. - If OAuth fails, upload
credentials.jsonagain, then clickStart Google OAuthagain to authorize.
3. Fill in Local Runtime Configuration
In the Local runtime configuration section, fill in these key fields:
Asana personal access token: the Asana PAT used to read from or write to Asana. Instructions for obtaining an Asana PAT are in the Asana API setup section 10.Gmail to Asana project name: the Asana project name where Gmail automation creates tasks, for exampleSkylar Test.Asana request timeout seconds: the Asana request timeout. The default is30.LLM API Key: the DashScope API key.LLM Model: the DashScope model. The default isqwen-plus; you can also chooseqwen-turboorqwen-max. Other LLM providers are not currently supported.Google Drive folder name: the Google Drive folder that Skylar uses when generating or matching documents.Executive Memory Gmail max results: the maximum number of Gmail messages scanned each time for Executive Memory. The default is100.RSS feed URLs: RSS feed URLs. You can enter multiple URLs, one per line or separated by commas.RSS request timeout seconds: the RSS request timeout. The default is15.
4. Choose the Gmail Query Scope
The Gmail query fields on the Setup page use dropdown selections. These fields include:
Gmail input queryGmail to Asana queryMail Reply queryDocument Generate query
Available values:
in:inbox category:primary is:unread: scans only unread messages in the Primary inbox. If your Gmail account shows the Primary category, use this value.

in:inbox is:unread: scans all unread inbox messages without limiting to the Primary category. If your Gmail account does not show Primary, use this value.

Executive Memory Gmail query is also selectable and follows the same logic:
in:inbox category:primary: scans messages in the Primary inbox.in:inbox: scans all inbox messages.
5. Enable the Automations You Need
At the bottom of the Setup page there are three automation switches:
Enable Gmail to Asana automation: when enabled, Skylar periodically reads matching unread Gmail messages and creates Asana tasks for important requirements or meetings.Enable Mail Reply drafts: when enabled, Skylar generates local reply drafts for unread Gmail messages. Replies are sent only after the user confirms.Enable Gmail document drafts: when enabled, Skylar combines Gmail requirements with Drive materials to generate document drafts.
These switches only control whether background workers run. After saving, it is recommended to restart Skylar so the background workers use the latest configuration.
6. Save Configuration and Restart
- After filling in the configuration, click
Save setup. Save setuponly saves the configuration. It does not immediately fetch Gmail, Drive, Asana, or RSS data.- After changing an API key, project name, Drive folder, query, or automation switch, exit and reopen Skylar.
- After reopening, Skylar starts background services and workers using the saved configuration.
- When upgrading Skylar, you usually do not need to configure it again. User configuration, the Google token, SQLite databases, and logs are kept in the local user data directory.
7. Data and Security
The Skylar desktop app stores user data in the local user directory. It does not write user data to the installation directory, and user data is not bundled into the installer.
- Windows:
%LOCALAPPDATA%\Skylar - macOS:
~/Library/Application Support/Skylar
This directory typically stores local setup configuration, the Google OAuth token, SQLite databases, runtime logs, and automation state.
The installer does not include your Gmail token, Asana PAT, DashScope API key, or local data. Upgrading the application only replaces program code and does not delete user data.
8. Troubleshooting
Google OAuth Fails
Select and save credentials.json again, then click Start Google OAuth. If it still fails, confirm that the Google OAuth client and authorization account are valid, and that the scopes include Gmail read/modify/send and Drive readonly/file.
Tasks Has No Data
Check the following:
- Gmail has unread messages matching
Gmail to Asana query. Enable Gmail to Asana automationis enabled.Asana personal access tokenis valid.Gmail to Asana project nameis an Asana project accessible by the current PAT.- Skylar has been restarted after saving configuration.
Mail Reply Has No Drafts
Check the following:
- Gmail has unread messages matching
Mail Reply query. - The sender can be replied to.
no-reply, notification, and bounce emails are skipped. Enable Mail Reply draftsis enabled.- Skylar has been restarted after saving configuration.
Doc Drafts Has No Document Drafts
Check the following:
- Gmail has unread requirement emails matching
Document Generate query. - The Google Drive folder name is correct.
- The Google token includes Drive permissions.
LLM API Keyis valid andLLM Modelis selected.Enable Gmail document draftsis enabled.- Skylar has been restarted after saving configuration.
Executive Memory Has Too Few Contacts
Check the following:
Executive Memory Gmail queryis not limited too narrowly to Primary.Executive Memory Gmail max resultsis not too small.- Gmail senders are recognizable, replyable contacts. System notifications and no-reply messages are filtered.
Do I Need to Configure Again After an Upgrade?
No, normally you do not. Skylar stores user data in the local user data directory. Upgrading only replaces application code and does not delete Setup configuration, the Google token, SQLite databases, or logs.
9. Google Gmail and Drive API Setup Steps
Step 1: Create a Project
- Sign in to Google Cloud Console.
- At the top of the page, click the project selector, usually labeled
Select a project, then clickNew Project.
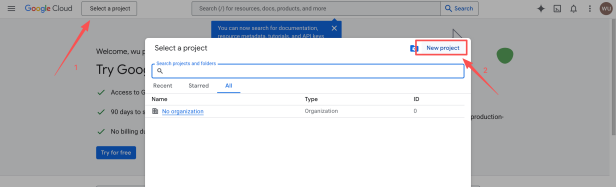
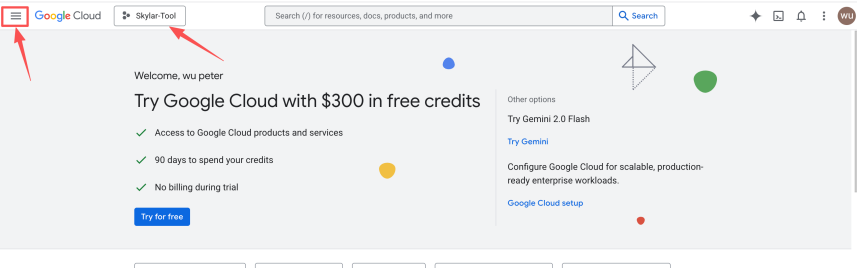
- Enter a project name, for example
Skylar-Tool, and clickCreate.
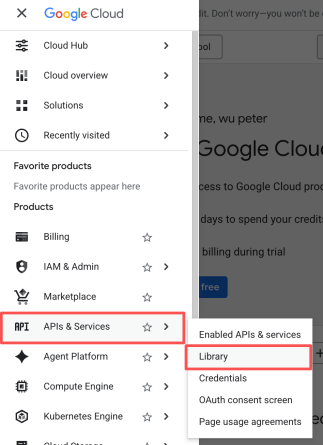
Step 2: Enable API Services
You need to tell Google which services this project will use:
- In the left menu, choose
APIs & Services>Library.
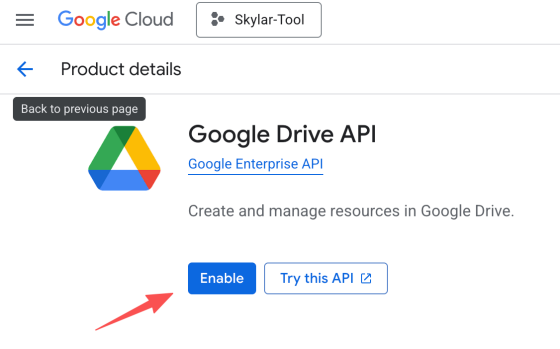
- Search for and enable these two APIs:
Google Drive APIGmail API
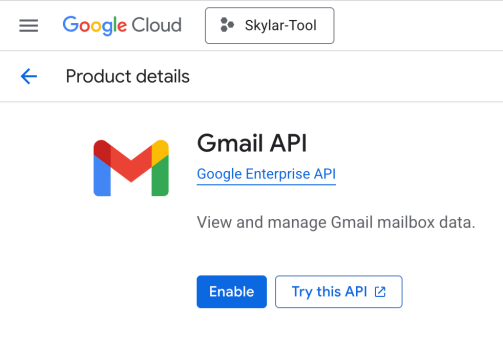
- Open each API and click
Enable.
Step 3: Configure the OAuth Consent Screen
The OAuth consent screen defines who can authorize this application.
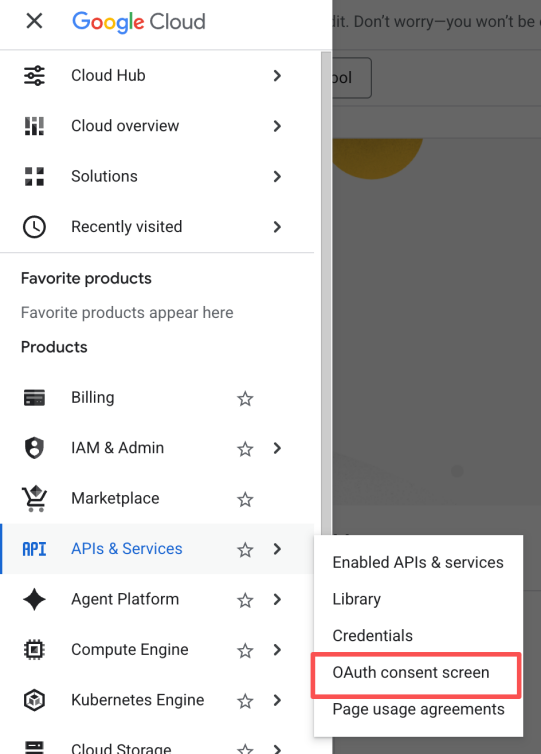
- Return to
APIs & Services>OAuth consent screen.
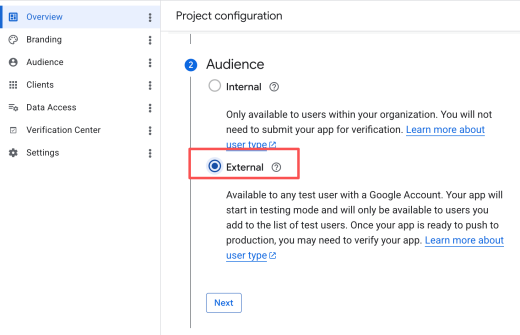
- Choose the user type:
- If you use a company domain email account through Google Workspace, choose
Internal. - If you use a personal Gmail account such as
@gmail.com, chooseExternal.
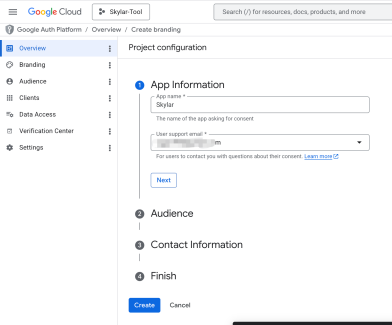
- Fill in the required information, including app name, user support email, and developer contact information.
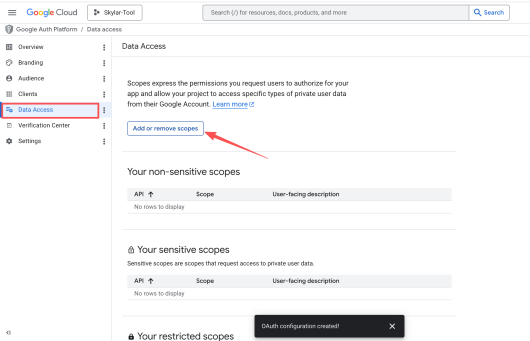
- For scopes, click
Add or Remove Scopes, search for and add../auth/gmail.readonly,../auth/gmail.modify,../auth/gmail.send,../auth/drive.readonly, and/auth/drive.file, or choose the permissions you need. You can also manually add these scopes:
https://www.googleapis.com/auth/gmail.readonly,
https://www.googleapis.com/auth/gmail.modify,
https://www.googleapis.com/auth/gmail.send,
https://www.googleapis.com/auth/drive.readonly,
https://www.googleapis.com/auth/drive.file
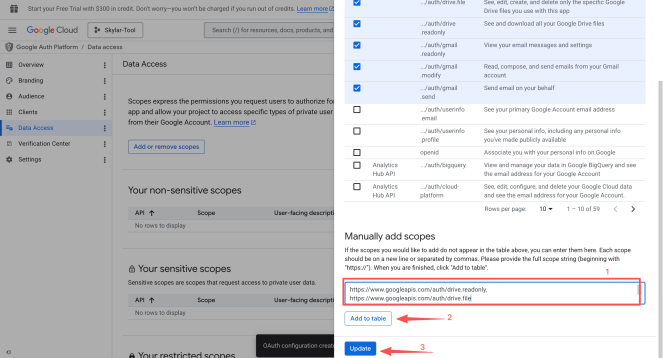
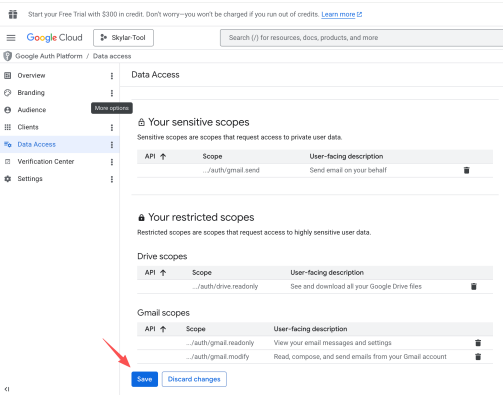
- Save after the scopes are added.
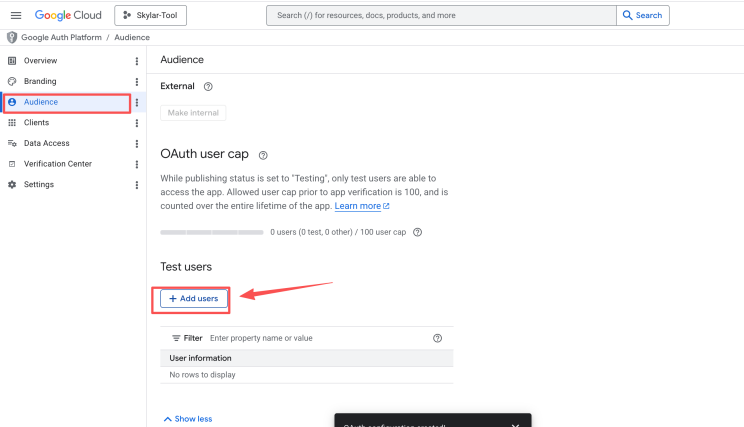
- For
Test Userswhen usingExternal, make sure to add the Gmail address you use. Otherwise, authorization may fail later.
Step 4: Create Credentials and Download JSON
This is the final and most important step.
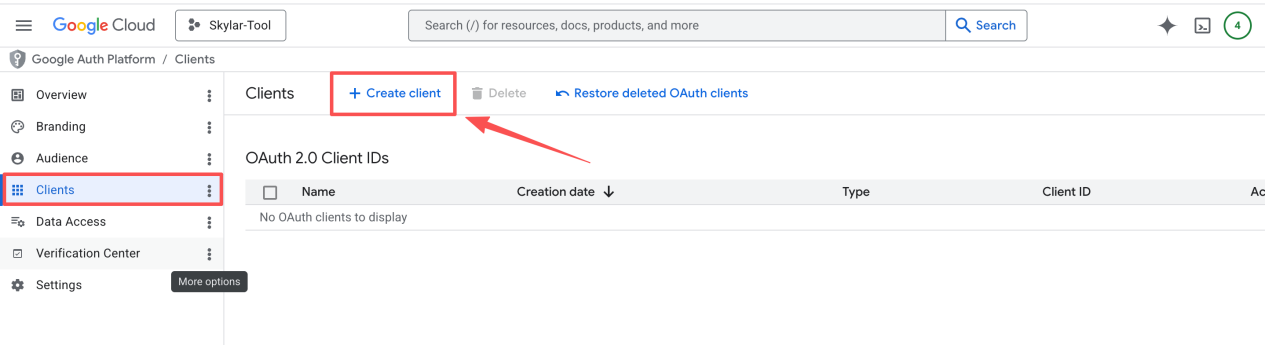
- Click
Clientsin the left menu. - Click
+ Create client, then selectOAuth client ID.
- Choose the application type:
- If you run locally, such as with Python or Node.js scripts, choose
Desktop app. - If you run on a server, choose
Web application.
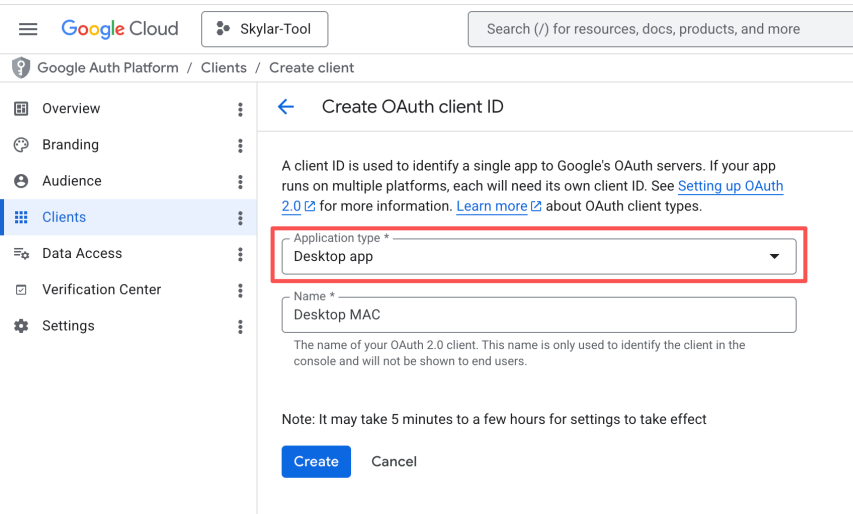
- Click
Create. - The dialog shows
OAuth client created. ClickDownload JSON.
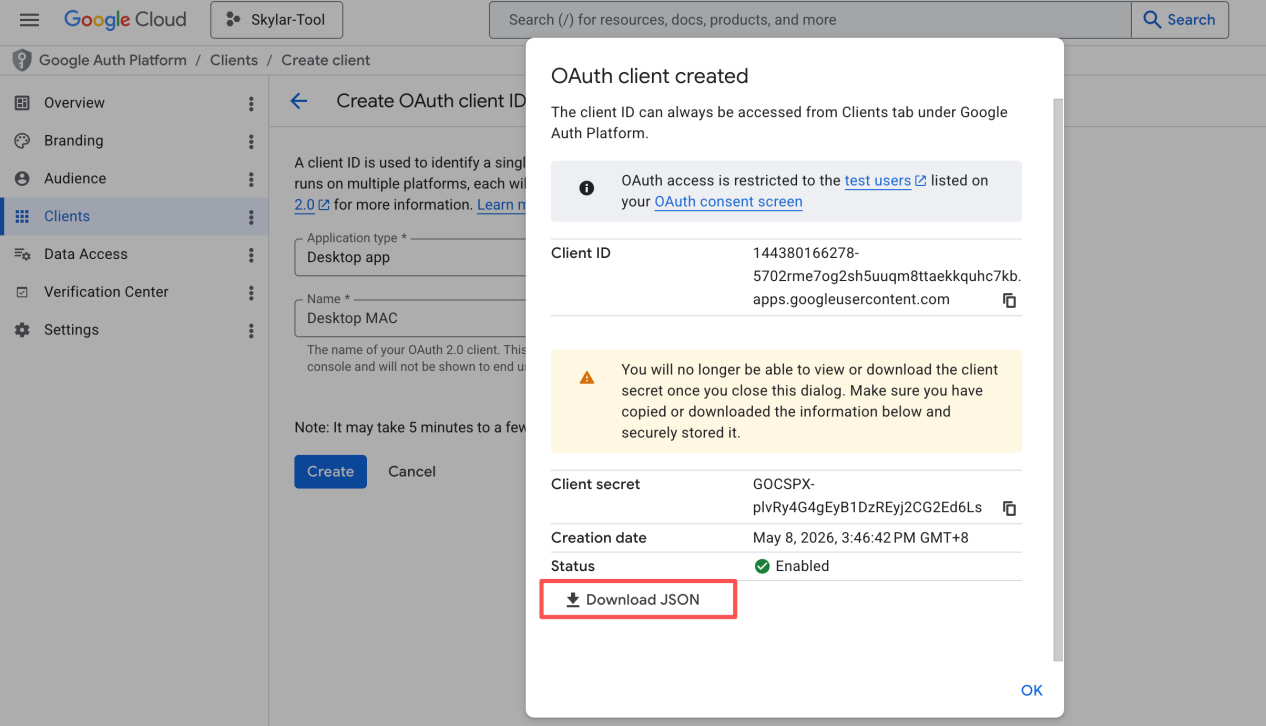
- Rename the downloaded file. The downloaded file name is usually long. Rename it to
credentials.json. It is recommended to place it in your project root directory.

10. Asana API Setup Steps
Sign in to Asana
Sign in to your Asana account and make sure this account can access the projects, tasks, teams, or workspace you want Skylar to read or update. A PAT has the same permissions as the Asana user who creates it. In other words, data that this user cannot see in Asana cannot be accessed through the API either.
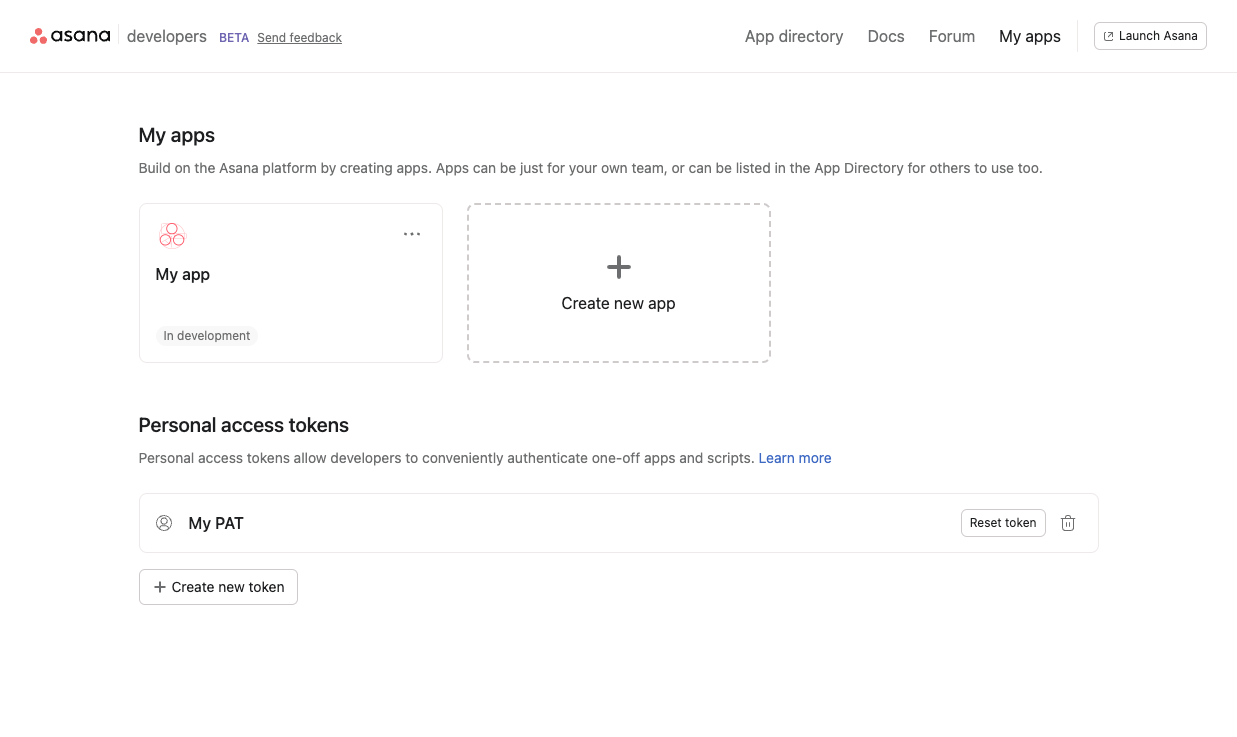
Open the Asana Developer Console
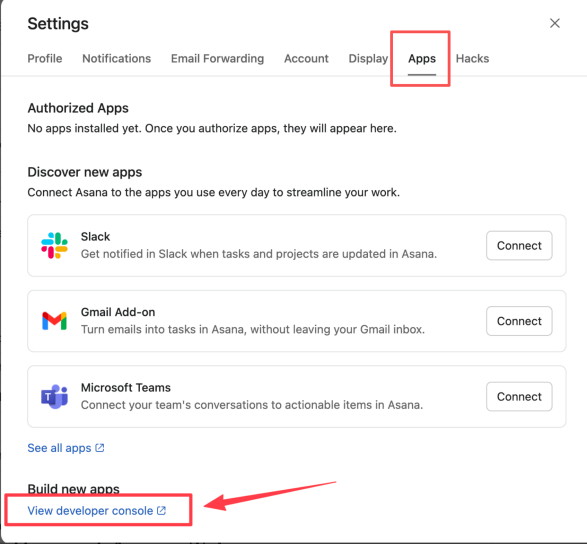
Open Asana personal settings, go to Apps, and then open the developer application management page.
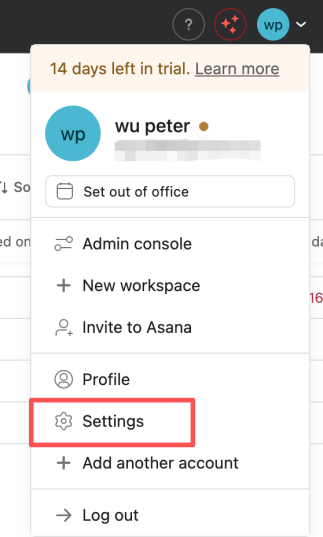
Select Apps, scroll to the bottom, and open the developer console.
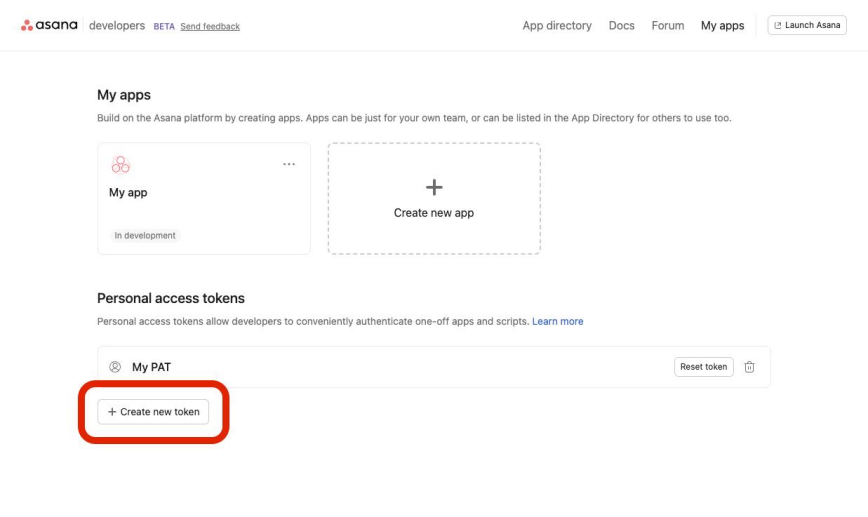
Create a Personal Access Token
In the Personal access tokens area, click Create new token or New access token.
Then fill in the following fields:
| Field | Example |
|---|---|
| Token name | internal-report-script, n8n-integration, asana-backup |
| API terms | Check the box to accept the Asana API terms |
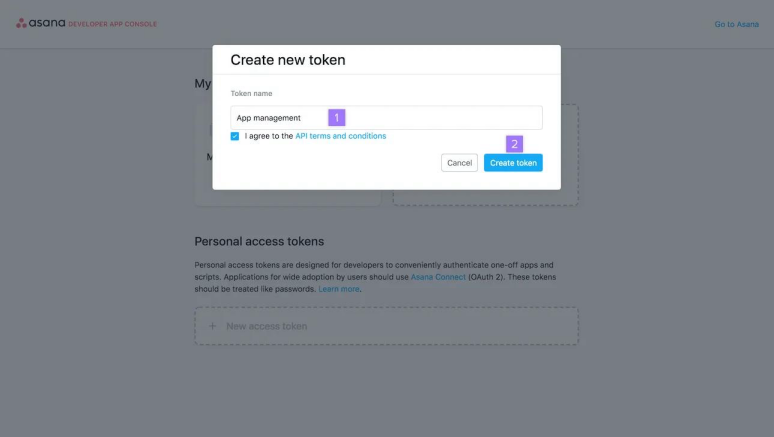
After you click Create token, Asana generates a token. Asana’s quick-start documentation notes that the token is shown only once, so copy it immediately and store it securely.
Store the Token Securely
Save the token in a secure place, for example:
ASANA_ACCESS_TOKEN=your_token